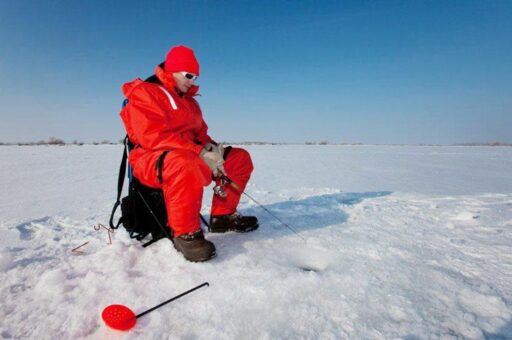
Ice fishing enthusiasts often need a sturdy and reliable rod holder to enhance their fishing experience. Building a DIY ice fishing rod holder can be a rewarding project, offering customization, cost-saving, and a perfect fit for your specific fishing needs. This step-by-step guide will walk you through the creation of your own ice fishing rod holder, from planning and material selection to construction and maintenance.
Key Takeaways
- A well-planned DIY ice fishing rod holder caters to personal needs and preferences while ensuring durability and accessibility on the ice.
- Selecting the right materials and applying protective coatings are crucial for withstanding the harsh conditions of ice fishing environments.
- Innovative design features, such as inclined openings and adjustable slots, can enhance functionality and ease of use for various rod sizes.
- Customization options allow for aesthetic enhancements and personal touches, making the rod holder a great personal use item or a thoughtful gift.
- Regular maintenance and proper storage are essential for extending the life of the DIY rod holder and keeping it in good condition for seasons to come.
Planning Your DIY Ice Fishing Rod Holder

Assessing Your Needs
Before diving into the construction of your ice fishing rod holder, it’s crucial to assess your specific needs. Consider the type of fishing you’ll be doing, the number of rods you want to accommodate, and the conditions you’ll face on the ice. This initial step will guide your choices throughout the building process.
- Type of Fishing: Will you be jigging, using tip-ups, or a combination of both?
- Number of Rods: How many rods do you plan to use simultaneously?
- Ice Conditions: Are you fishing on hard-packed ice or in areas with heavy snow cover?
- Portability: Do you need a lightweight holder for easy transport?
By taking the time to evaluate these factors, you’ll ensure that your DIY rod holder meets your fishing needs and enhances your ice fishing experience.
Remember, the goal is to create a rod holder that is not only functional but also suits your personal style of fishing. Whether you’re a casual angler or a seasoned ice fisher, a well-planned rod holder can make all the difference.
Choosing the Right Materials
Selecting the appropriate materials for your ice fishing rod holder is crucial for both performance and longevity. Durability and resistance to cold temperatures are key factors to consider when choosing materials. Metals such as aluminum or stainless steel are excellent choices for their strength and corrosion resistance, while certain plastics can offer good performance if they are designed for low-temperature use.
Materials commonly used in rod holder construction include:
- Metals like aluminum or stainless steel
- High-density plastics
- Wood (treated for water resistance)
It’s important to balance the need for a lightweight design with the requirement for stability and strength. A rod holder that is too heavy may be cumbersome to transport, while one that is too light might not provide the necessary support on the ice.
Additionally, consider the ease of working with each material. If you have limited tools or experience, simpler materials like wood might be a better starting point. For those with access to metalworking tools, metal constructions can offer a more professional finish and increased durability.
Design Considerations for Durability and Accessibility
When designing your DIY ice fishing rod holder, durability and accessibility are paramount. The holder must withstand the harsh conditions of ice fishing, including extreme cold and potential moisture exposure. Materials such as high-density plastics or treated woods are often recommended for their resilience and longevity.
- Material Choices: Select materials that resist corrosion and wear.
- Design Simplicity: Aim for a straightforward design that allows for easy repairs.
- Accessibility: Ensure that the holder is easy to use, even with gloves on.
The design should balance sturdiness with ease of use, allowing anglers to quickly and safely secure or retrieve their rods. This is especially important in cold weather conditions where dexterity may be reduced.
Consider the weight and portability of the holder, as it will need to be transported to and from fishing locations. A lightweight yet sturdy design can significantly enhance the fishing experience.
Tools and Safety Equipment
Before you begin constructing your DIY ice fishing rod holder, it’s essential to gather the right tools and safety equipment. This will not only make the building process smoother but also ensure your safety throughout the project.
For the construction phase, you’ll need a variety of cutting and finishing tools. These may include saws for cutting the base and frame, sandpaper or abrasives for smoothing edges, and possibly a drill for assembling parts. Measuring tools are crucial for precision, while pens and markers will help in marking accurate measurements.
Safety should never be compromised. Equip yourself with protective gear such as gloves to prevent cuts, goggles to shield your eyes from debris, and ear protection if you’ll be using loud power tools. A well-ventilated workspace is also important to avoid inhaling dust or fumes.
Remember, a well-prepared workspace is the foundation of a successful DIY project. Take the time to organize your tools and safety equipment before starting.
Lastly, consider the maintenance of your tools. Keeping them clean and stored properly will extend their lifespan and ensure they’re ready for your next project.
Constructing the Base and Frame

Cutting and Assembling the Base
The foundation of a sturdy ice fishing rod holder begins with a well-constructed base. Start by measuring and cutting your chosen material to the desired dimensions. Ensure all edges are smooth and even to provide a stable platform.
Next, assemble the base using appropriate fasteners or adhesives. If you’re using wood, screws or nails may be the best option, while metal or plastic bases might require specialized glues or rivets. Here’s a simple list to guide you through the process:
- Measure the base material according to your design specifications.
- Cut the material using the correct tools for your material type.
- Sand or file down any rough edges for a smooth finish.
- Join the pieces securely, checking for level and alignment.
Remember, the base is critical for the overall stability of your rod holder, so take your time to get it right.
Once the base is assembled, test it on a flat surface to ensure it’s level and ready to support the frame structure. This step is crucial before moving on to building the frame.
Building the Frame Structure
Once you have the base of your ice fishing rod holder ready, it’s time to focus on building the frame structure. This frame will support your fishing rods and must be sturdy enough to withstand the harsh conditions on the ice. Start by measuring and cutting the materials you’ve chosen for the frame. Whether you’re using wood, metal, or PVC, ensure that all pieces are cut to the precise dimensions needed for a snug fit.
- Measure twice, cut once to ensure accuracy.
- Assemble the frame using screws or adhesive appropriate for the material.
- Test the frame’s strength by applying pressure; it should not wobble or bend.
Remember, the frame’s design should allow easy access to your rods while keeping them secure. Consider the height and angle of the frame to provide the best possible fishing experience.
Finally, double-check all connections and joints for any potential weak points. Reinforce these areas if necessary to guarantee that your rod holder will last for many seasons to come.
Ensuring Stability on Ice
Ensuring your DIY ice fishing rod holder remains stable on the icy surface is crucial for a successful fishing experience. The base of the rod holder should be broad and heavy enough to prevent tipping, especially in windy conditions. To achieve this, you can use materials like metal or dense wood, and add weight if necessary.
- Use a wide base for better weight distribution.
- Add weight to the base, such as sandbags or metal weights.
- Consider the use of spikes or cleats that can grip into the ice for added stability.
When constructing your rod holder, always test its stability on a safe, controlled ice surface before heading out to fish. This precaution ensures that your holder will not tip over and potentially lose your equipment or catch.
Remember, the stability of your rod holder also depends on the evenness of the ice surface. Regularly check and adjust the position of the holder throughout the day as the ice conditions change.
Attaching the Frame to the Base
Once the frame structure is complete, it’s time to securely attach it to the base. This step is crucial as it ensures the stability and durability of your ice fishing rod holder. Begin by aligning the frame with the pre-drilled holes in the base. Use bolts and nuts that are appropriate for the materials you’ve chosen; for example, stainless steel hardware is recommended for its resistance to rust.
- Place the frame onto the base, ensuring it is perfectly aligned.
- Insert bolts through the aligned holes and hand-tighten the nuts.
- Use a wrench to fully tighten the nuts, ensuring a snug fit without over-tightening.
- Double-check all connections to make sure they are secure.
It’s important to periodically check the tightness of the bolts, especially after transporting the rod holder or after a period of use.
After the frame is attached, give it a gentle shake to test for any movement. If the frame wobbles, re-tighten the connections. Once you are satisfied with the stability, your rod holder is ready for the next step: adding the rod holding mechanism.
Adding the Rod Holding Mechanism

Designing the Rod Slots or Clips
When designing the rod slots or clips for your ice fishing rod holder, consider the variety of rod sizes and styles you plan to accommodate. This will ensure that each rod fits securely and is easily accessible when you need it.
- Measure the diameter of your rods to determine the size of the slots or clips.
- Decide on the number of rods you want to hold and plan the spacing accordingly.
- Consider the ease of inserting and removing rods, especially with gloved hands in cold conditions.
The design should not only be functional but also protect your rods from scratches and damage while they are being held.
Remember to leave some room for adjustment in your design, as you may acquire different rods in the future or lend your holder to a fellow angler. The goal is to create a holder that is versatile and can adapt to various fishing situations.
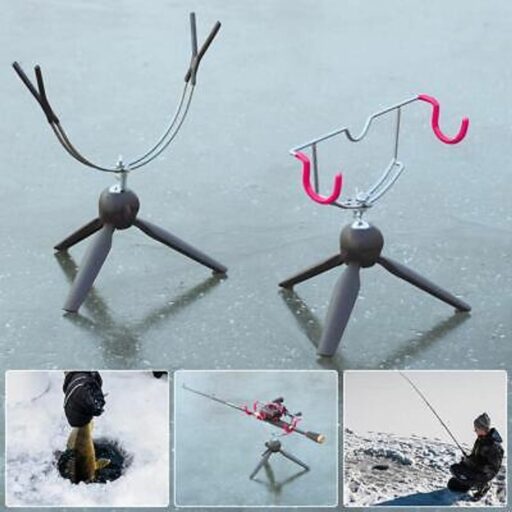
Incorporating the Inclined Opening Design
The inclined opening design is a critical feature for any DIY ice fishing rod holder, providing ease of access and secure storage. Inspired by commercial products like the PLUSINNO H5, which boasts a 15-degree inclined opening, this design allows for quick and effortless one-handed operation. The angle ensures that rods can be easily inserted or removed, even when wearing gloves in cold conditions.
To implement this feature, consider the following steps:
- Determine the optimal angle for your specific needs, which may vary based on the type of fishing rods you use.
- Cut the opening at the chosen angle, ensuring precision for a snug fit.
- Reinforce the edges of the opening to prevent wear and tear from repeated use.
By incorporating an inclined opening into your rod holder, you not only enhance functionality but also add a professional touch to your DIY project.
Remember to take every detail seriously, from the angle of the opening to the materials used for reinforcement. This attention to detail will result in a product that not only looks good but also stands up to the rigors of ice fishing.
Securing Rods in Place
Once the rod holding mechanism is in place, it’s crucial to ensure that your fishing rods are secured firmly. Proper securing prevents rods from slipping out and potentially getting lost in the ice. For this purpose, you can use various methods such as Velcro straps, rubber clamps, or locking mechanisms. Each method has its pros and cons, so choose one that best fits the size and style of your rods.
- Velcro straps are adjustable and quick to fasten, making them ideal for rods that vary in size.
- Rubber clamps offer a snug fit and can be designed to accommodate a range of diameters.
- Locking mechanisms provide the most secure hold but may require more effort to release the rod when a fish is caught.
Ensuring that your rods are secure is not just about safety; it’s about peace of mind. Knowing that your equipment is safely in place allows you to focus on the fishing experience without worry.
Remember to periodically check the tightness and condition of the securing elements, especially in extreme temperatures where materials can contract or expand. This simple step can save you from the inconvenience of repairs or replacements during your fishing trip.
Adjusting for Different Rod Sizes
When creating a DIY ice fishing rod holder, it’s essential to accommodate various rod sizes to ensure versatility and functionality. Adjusting for different rod sizes can be achieved by incorporating adjustable elements into your design. For instance, using wing nuts and bolts allows for quick adjustments without the need for additional tools.
To cater to a range of rod diameters, consider the following steps:
- Measure the diameter of your smallest and largest fishing rods.
- Create multiple holes or slots in your rod holder, each suited to a different size.
- Use removable inserts or sleeves that can be added or taken out to fit each rod snugly.
Ensuring that your rod holder can adapt to different sizes not only increases its utility but also makes it a more inclusive tool for anglers with varying equipment.
Remember to test the fit for each rod size and make any necessary refinements. This might involve sanding down edges or adding padding for a tighter grip. The goal is to secure the rod firmly while allowing for easy removal when a fish strikes.
Finishing Touches and Customization

Applying Protective Coatings
Once your DIY ice fishing rod holder is assembled, applying a protective coating is essential to ensure its longevity and resistance to the harsh winter elements. Choose a coating that is specifically designed for marine environments to provide the best protection against moisture, ice, and temperature fluctuations.
Here’s a list of potential coatings and related supplies you might consider:
- Topside Paint
- Non-Skid Deck Paint
- Marine Primer
- Resin & Resin Hardener
- Fiberglass Cloth & Tape
- Gelcoat Repair
Remember, the right finish not only preserves your rod holder but also enhances its appearance. Take the time to apply multiple thin layers, allowing adequate drying time between each, for a durable and professional-looking result.
For detailed application techniques and additional tips, consider visiting a website page that offers insights on various types of fishing. Such resources often allow readers to share their own fishing tips in the comments section, which can be a valuable source of community knowledge.
Adding Aesthetic Elements
Once the functionality of your ice fishing rod holder is secured, it’s time to add a personal touch. Customizing your rod holder not only makes it visually appealing but also allows for easy identification on the ice. Consider using decals, stickers, or even hand-painted designs to infuse a bit of personality into your creation.
For those who enjoy showcasing their craftsmanship, adding custom inlays or marbling effects can be a rewarding process. These techniques require patience and a steady hand, but the results are often stunning and unique. Below is a list of aesthetic enhancements you can consider:
- Decals & Stickers
- Custom Inlays
- Marbling
- Hand-painted Designs
Remember, the goal is to create a rod holder that reflects your style while still being practical for ice fishing. > When choosing decorative elements, ensure they do not interfere with the holder’s functionality or durability. <
Lastly, for inspiration and ideas, you might want to visit a website page featuring a variety of fishing rods and tips for different fishing techniques and gadgets. This can provide valuable insights into the latest trends and styles in the fishing community.
Customizing for Personal Use or Gifts
Customizing your DIY ice fishing rod holder adds a personal touch that can make it a cherished item for personal use or a thoughtful gift. Consider engraving names or special messages on the rod holder to personalize it. For those who are crafty, painting or adding decals can transform the rod holder into a unique piece of art.
- Engraving names or messages
- Painting with weather-resistant paint
- Applying decals or stickers
- Adding decorative elements like beads or etchings
Remember, customization not only enhances the visual appeal but also adds sentimental value, making it a great gift for fellow anglers.
For inspiration, look to online marketplaces like Etsy, where you can find plans for a fishing rod rack that can be tailored to your needs. These plans often suggest using common materials like 1 x 12 x 6 boards, which are readily available at lumber stores. Whether you choose to screw or nail the pieces together, the final product is sure to be great for your fishing adventures or as a gift.
Final Assembly and Inspection
With all components of your DIY ice fishing rod holder assembled, it’s time for the final assembly and inspection. Ensure that all parts are securely fastened and that there are no loose ends that could compromise the stability or functionality of the holder. Double-check the tension knobs for the rod supports, as these can be tight and require fine-tuning to achieve the perfect grip on your fishing rods.
During this phase, it’s crucial to inspect every joint, adhesive point, and finish. Any weak spot could lead to equipment failure during use, so take the time to address any issues now.
Before declaring your project complete, run through a checklist to confirm that every aspect of the rod holder meets your expectations. Here’s a simple list to guide you:
- Inspect the tension arm and ensure it’s firmly attached.
- Verify that the rod slots or clips hold the rods securely without too much play.
- Check the base and frame for stability on the ice.
- Confirm that the protective coatings are evenly applied and free of drips or sags.
Remember, this rod holder is a reflection of your craftsmanship. Taking the time to thoroughly inspect and test your creation will pay off when you’re out on the ice, enjoying a hassle-free fishing experience.
Maintenance and Care for Your Rod Holder

Routine Cleaning and Upkeep
To ensure the longevity and optimal performance of your DIY ice fishing rod holder, regular maintenance is crucial. Begin with regular checks to identify any signs of wear or damage. This proactive approach can prevent minor issues from becoming major problems.
Cleaning your rod holder after each use is essential to remove any bait residue, dirt, or water spots. Use a mild detergent and warm water for cleaning, and avoid harsh chemicals that can damage the material. Here’s a simple cleaning routine to follow:
- Rinse with fresh water to remove loose debris.
- Gently scrub with a soft brush or cloth and mild detergent.
- Rinse thoroughly to eliminate any soap residue.
- Dry completely before storing to prevent rust or mildew.
Remember, taking the time to clean and inspect your rod holder after each outing will extend its life and ensure it’s ready for your next ice fishing adventure.
Protecting from the Elements
When it comes to ice fishing, safeguarding your DIY rod holder from the harsh winter elements is crucial. Proper protection ensures longevity and reliability of your equipment throughout the fishing season. Utilize materials like marine finishing, caulking, and adhesives that are designed to withstand cold temperatures and moisture. These substances help prevent damage from snow, ice, and wind.
To further enhance the durability of your rod holder, consider the application of protective coatings. A high-quality marine varnish or sealant can shield the wood or metal components from water and UV damage, reducing the risk of corrosion or decay. It’s also beneficial to use zincs or anodes for metal parts to prevent galvanic corrosion.
While your rod holder is built to be sturdy, additional measures such as securing it with ice anchors or tie-downs can improve stability in gusty conditions. This not only protects the holder but also ensures safety for you and your equipment.
Remember, the care you put into protecting your rod holder from the elements will pay off by extending its service life and maintaining its functionality. For reference, consider the attributes of the highest-rated fishing rod sleeves, which are capable of resisting up to 120 degrees and protect against scratches, mold, dust, and other weather elements.
Storage Tips for Off-Season
Proper off-season storage of your DIY ice fishing rod holder is crucial to ensure its longevity and readiness for the next fishing season. Store your rod holder in a cool, dry place to prevent any potential damage from moisture or extreme temperatures. If possible, hang the rod holder on a wall or place it on a shelf to keep it off the ground and away from any pests or rodents.
- Clean the rod holder thoroughly before storing it.
- Disassemble any removable parts to save space and prevent stress on the components.
- Wrap the rod holder in a breathable material to protect it from dust.
- Check for any necessary repairs and address them before storage.
By following these simple steps, you can help maintain the condition of your rod holder and avoid any unpleasant surprises when it’s time to hit the ice again.
Troubleshooting Common Issues
When you encounter issues with your DIY ice fishing rod holder, it’s essential to systematically address them to ensure a quick return to functionality. Start by checking the most common problem areas, such as the stability of the base, the integrity of the rod holding mechanism, and the condition of any moving parts.
- Base Stability: Ensure the base is level and securely fastened to the frame. If it wobbles, tighten any loose connections or add weight for better anchorage on the ice.
- Rod Holding Mechanism: Inspect for wear and tear, especially if the rods are not being held firmly. Replace any worn-out parts or adjust the tension as needed.
- Moving Parts: Lubricate hinges or swivels to maintain smooth operation. If parts are corroded or damaged, consider replacing them.
In the event that these steps do not resolve the issue, don’t hesitate to seek expert support. Our team is dedicated to helping you complete your build and get back on the water.
Remember, regular maintenance can prevent many common issues from arising. Keep your rod holder clean, dry, and inspect it periodically for signs of wear. If you’re unsure about a particular problem, consult online resources or reach out to fellow anglers for advice. Our [website page](#) provides tips, techniques, and gadgets for various types of fishing rods, and readers are encouraged to share valuable fly fishing techniques in the comments section.
Conclusion
In conclusion, crafting your own DIY ice fishing rod holder is not only a satisfying project but also a practical solution for organizing your fishing gear. Throughout this guide, we’ve explored the necessary materials, tools, and steps to create a sturdy and functional rod holder. Whether you’re a seasoned ice angler or a beginner, having a custom rod holder will enhance your fishing experience by keeping your equipment secure and easily accessible. Remember, the key to a successful DIY project is patience and attention to detail. With your new rod holder ready, you’re all set to enjoy a more organized and efficient ice fishing adventure. Tight lines and happy crafting!
Frequently Asked Questions
What materials are best for making a DIY ice fishing rod holder?
Durable materials such as PVC pipes, metal rods, or heavy-duty plastic are ideal for constructing a DIY ice fishing rod holder. Choose materials that can withstand low temperatures and exposure to water.
How do I ensure my ice fishing rod holder is stable on the ice?
To ensure stability, the base should be wide and heavy enough to prevent tipping. You can also use metal spikes or screws to anchor the holder into the ice if necessary.
Can I adjust the DIY rod holder to fit different sizes of fishing rods?
Yes, you can design your rod holder with adjustable slots or removable clips to accommodate various rod diameters. Incorporate a mechanism that allows for easy adjustment.
What kind of protective coatings should I apply to my rod holder?
Use water-resistant sealants or rust-proof paint to protect your rod holder from moisture and corrosion. These coatings will extend the life of your holder and maintain its appearance.
How do I properly maintain and store my ice fishing rod holder off-season?
Clean your rod holder with fresh water after each use, dry it thoroughly, and store it in a cool, dry place. Regularly inspect for any signs of wear or damage and repair as needed.
Are there any safety precautions I should take when constructing my rod holder?
Always wear appropriate safety gear such as gloves and goggles when cutting or drilling materials. Follow tool instructions carefully and work in a well-ventilated area to ensure safety.